APPLICATION NOTE
2013-10-30
Measuring kVp on an AMX 4 or 4+
APPLIES TO
RaySafe Xi, Unfors Xi Platinum or Unfors Xi Platinum Plus with R/F or R/F+MAM detector
RaySafe or Unfors Solo RAD,
RaySafe or Unfors Solo R/F
(All must have detector firmware version 5.xx or 6.01)
BACKGROUND
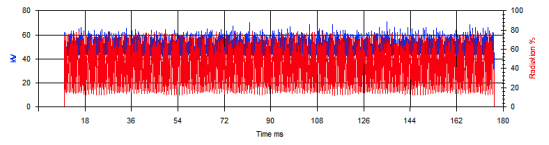
GE portable X-ray machines, AMX 4 and AMX 4+, have generators that produce kV with ripple that can make kVp measurements with non-invasive kVp meters challenging. The waveform below shows the ripple on the kV waveform, in blue, and the radiation waveform, in red.
The instruments listed above have the bandwidth necessary to obtain accurate kVp measurements without correction factors or post-exposure processing. The purpose of this document is to explain how to obtain accurate kVp measurements for preventative maintenance and calibration of these GE portable X-ray machines.
NOTES
“Detector” means any of the detectors listed above.
For the purpose of this application note, The RAD sensor area found on the Solo RAD detector is the equivalent of the R/F High sensor area found on Xi systems.
INSTRUCTIONS
kVp MEASUREMENTS FOR PREVENTATIVE MAINTENANCE AND QA
1) Position the detector on a flat surface with the R/F High sensor area centered in the field and perpendicular to the anode-cathode axis of the tube. The collimator should be at the 0 degree detent position. The FDD should be as short as possible.
2) Power on the instrument and select “R/F High” (or “RAD”) from the Sensor Menu.
3) Expose with mAs set nominally to 20 and observe the kVp reading in the base unit display or in Xi View. The displayed unit must be “kVp” otherwise the reading will be inaccurate!
4) If the displayed unit is “kV,” decrease the FDD and make another exposure. Repeat this until “kVp” is displayed.
kVp MEASUREMENTS FOR kV CALIBRATION
1) Position the detector on a flat surface with the R/F High sensor area centered in the field and perpendicular to the anode-cathode axis of the tube. The collimator should be at the 0 degree detent position. The FDD should be as short as possible.
2) Power on the instrument and select “R/F High” (or “RAD”) from the Sensor Menu.
3) The AMX 4 / AMX 4+ produces a series exposures having an exposure time of nominally 50 ms during kV calibration. The filament current has not yet been calibrated so the kV could ramp up to its final value. A combination of a 10 ms trig delay and a 10 ms kVp delay must be used to avoid measuring kVp on this slope.

4) Observe the kVp reading in the base unit display or in Xi View. The unit must be “kVp” otherwise the reading will be inaccurate!
5) If the displayed unit is “kV,” decrease the FDD and make another exposure. Repeat this until “kVp” is displayed.
CONTACT
Please visit http://www.raysafe.com for contact information.