OneQA Workflow Automation Software

Workflow automation made easy
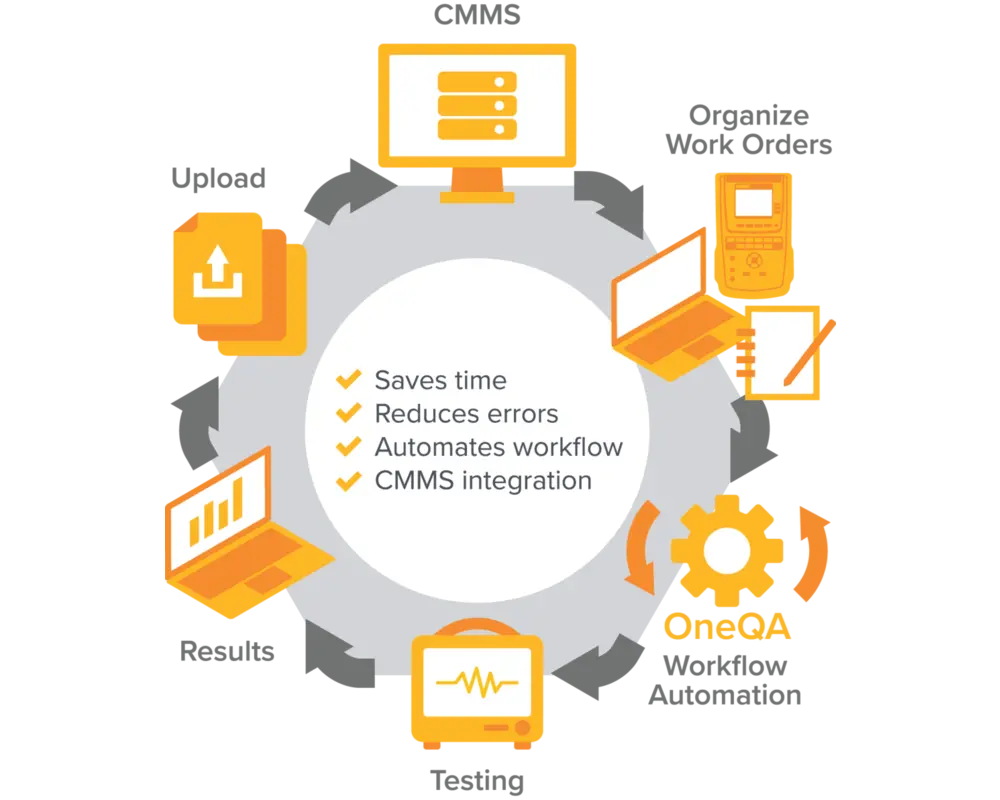
Streamline biomedical testing from a central hub
Why OneQA?
Why OneQA?
Meet Jamie Spragis, CBET: Your go-to OneQA expert breaking down how to simplify, automate, and transform your workflow
Schedule a quick demo with Jamie to see for yourself the value OneQA can bring to your organization.
Relentlessly focused on adding value to our hospital, ISO and OEM partners, cloud-based OneQA software works behind the scenes so you can focus on the work that is most important.
Standardization + procedure management
Standardize procedures, manuals, information, notes, and instructions with a focus on keeping medical equipment safer with patient safety at the core of our innovation.
Documentation + reporting
Manage workorders, results, and reports - routing data across systems, cloud services and people including built-in integrations to CMMS providers.
Automation + efficiency
Create custom workflows to standardize your facility, boost productivity and maximize compliance all from a single platform. Setup is easy and maintenance is low.
OneQA End to End Workflow Automation
Customer Success Stories
ReNew Biomedical
Ease of use, the ability to build procedures, and integrated test setup guidance to quickly bring new techs up to speed made OneQA the ideal solution for ReNew Biomedical.
OneQA has helped us with speed, but it’s also helped us ensure that every step is getting done along the way and that everyone knows exactly how to do each step.
Biomedical Manager, CBET
ReNew Biomedical
Mount Nittany Health
See how one client realized workflow automation and increased efficiencies with the help of OneQA.
Love the standardization. It works seamlessly with our CMMS system.
Biomedical Department Manager
Mount Nittany Health
Webinar series
Uncover Common Myths in Biomedical Testing
This webinar helps to debunk some common myths and share some best practices and shortcuts. OneQA is featured as an enabler of several shortcuts including standardizing your test procedures and utilizing workflow automation to save you time and improve test quality. This webinar features a testimonial from one of our customers, Mt. Nittany Medical Center, and a quick demo of how OneQA procedure standardization, automation, and reporting looks and feels. Be sure to check it out!
Receive 1 ACI credit for attending.

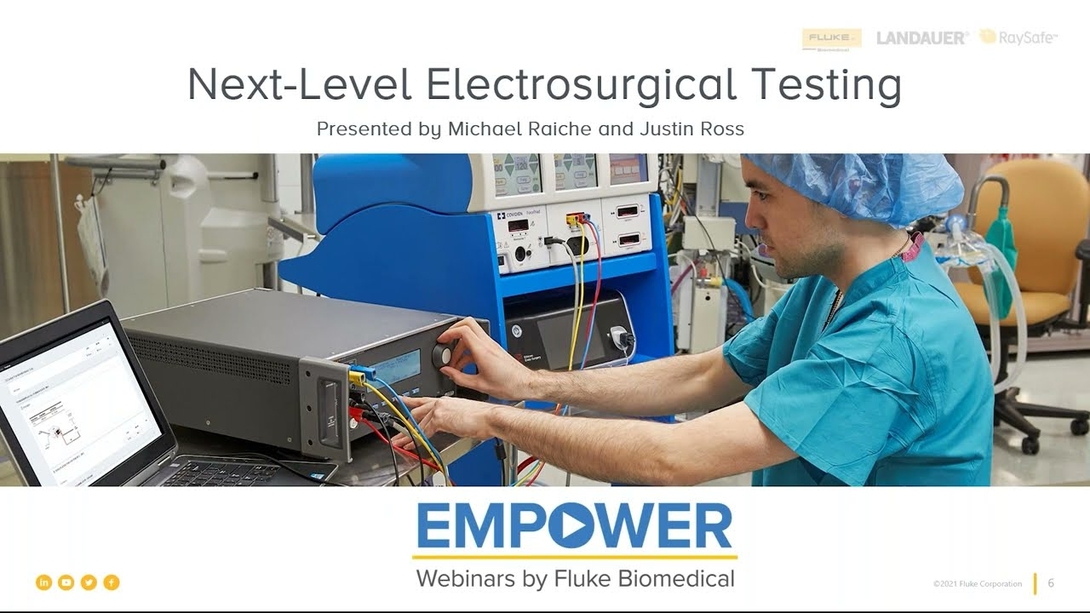
Next-Level Electrosurgical Testing
In this webinar focused on Electrosurgical Testing, OneQA is touted as a strong best practice – ensuring all test steps are in the procedure enabling every technician the ability to see how to make the connections and how to easily automate documentation and reporting. As a special feature, a quick OneQA demonstration was held at the end to show all of this in action. See how OneQA can help you take your electrosurgical testing to the next level.
Getting started with OneQA is easy
Simply follow these steps to complete your first fully automated procedure.
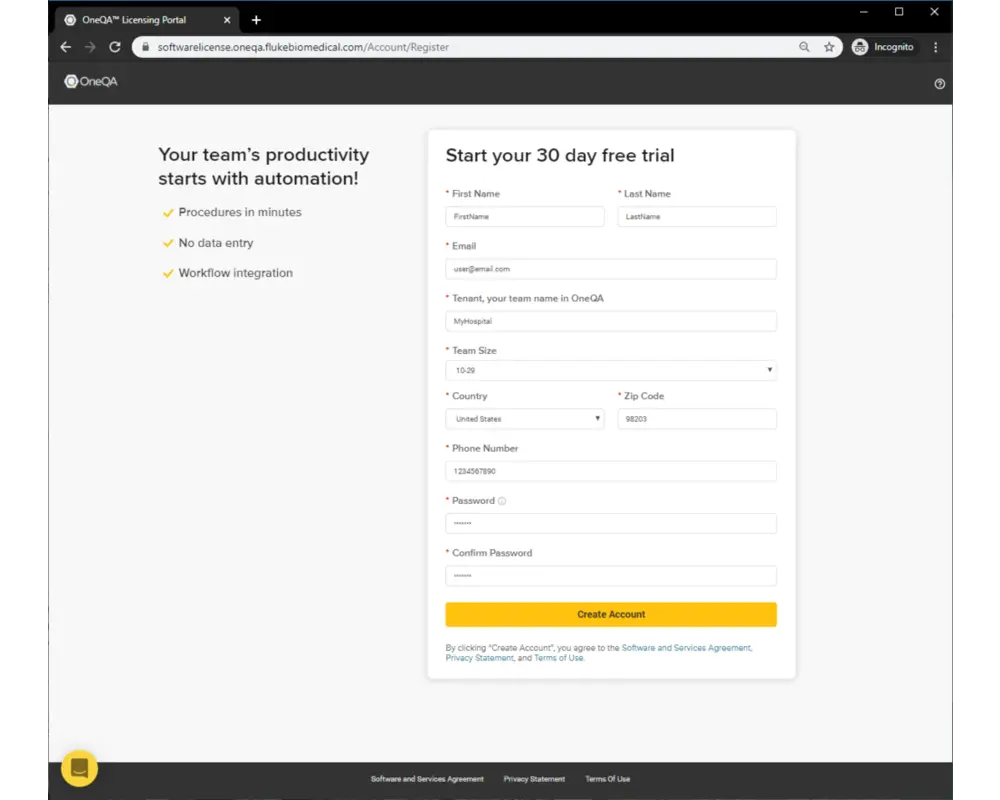
Step 2
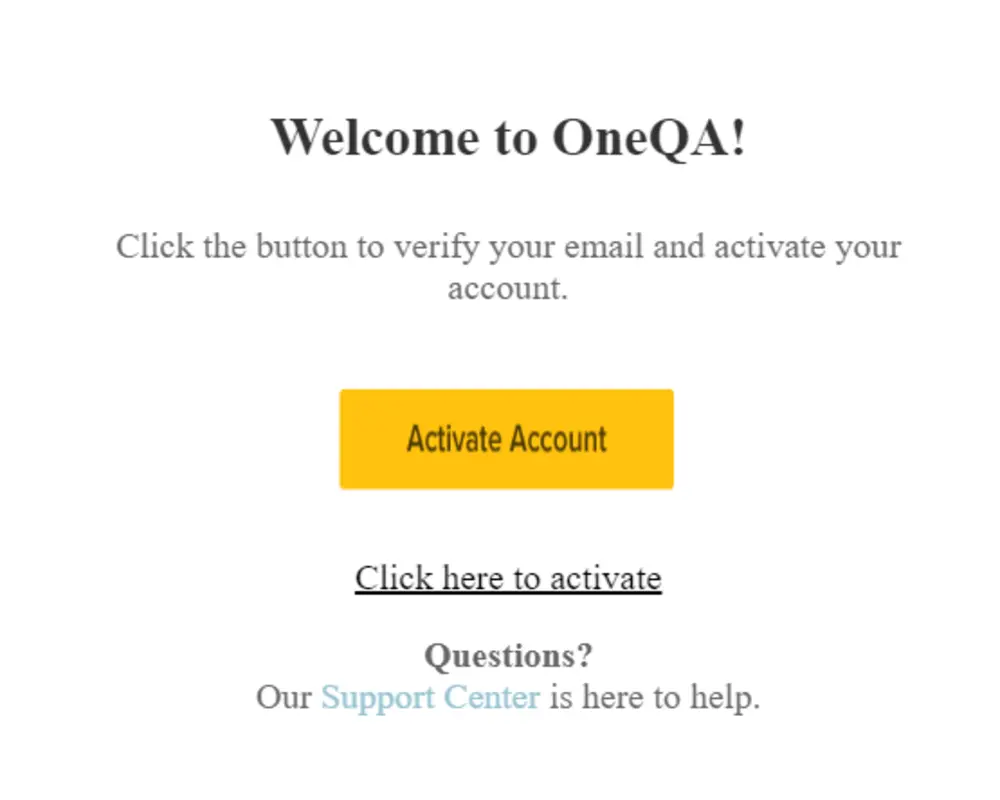
After creating a user account, a verification email will be sent to the email address provided. After receiving the email, click to Activate Account, which will redirect you back to the Licensing Portal login.
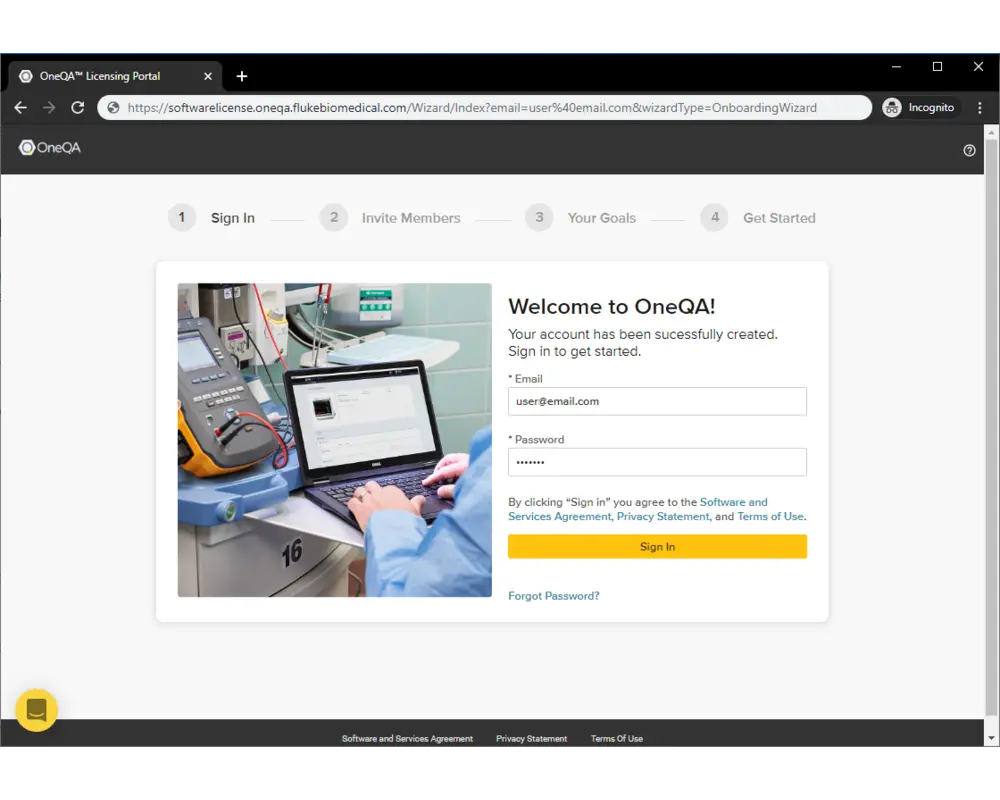
Step 3
Enter the credentials for your new account and sign in.
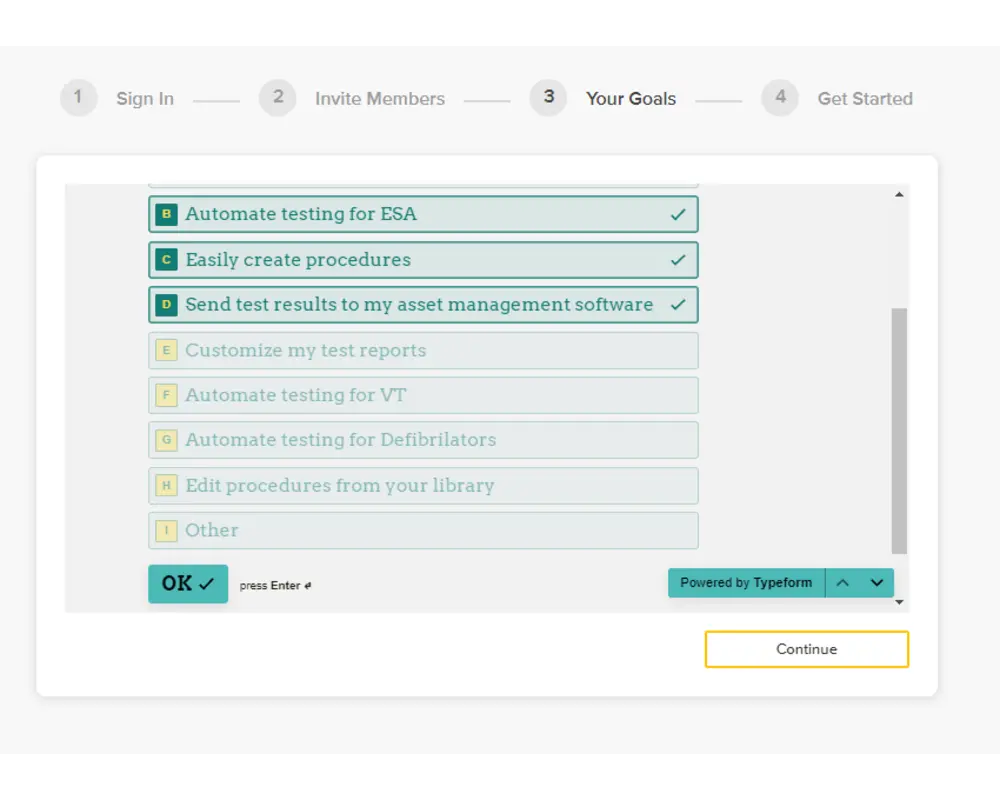
Step 4
On the following form, you can provide details about your goals from using OneQA, which will help us tailor your experience to you. Kindly submit your responses and then click 'Continue'.
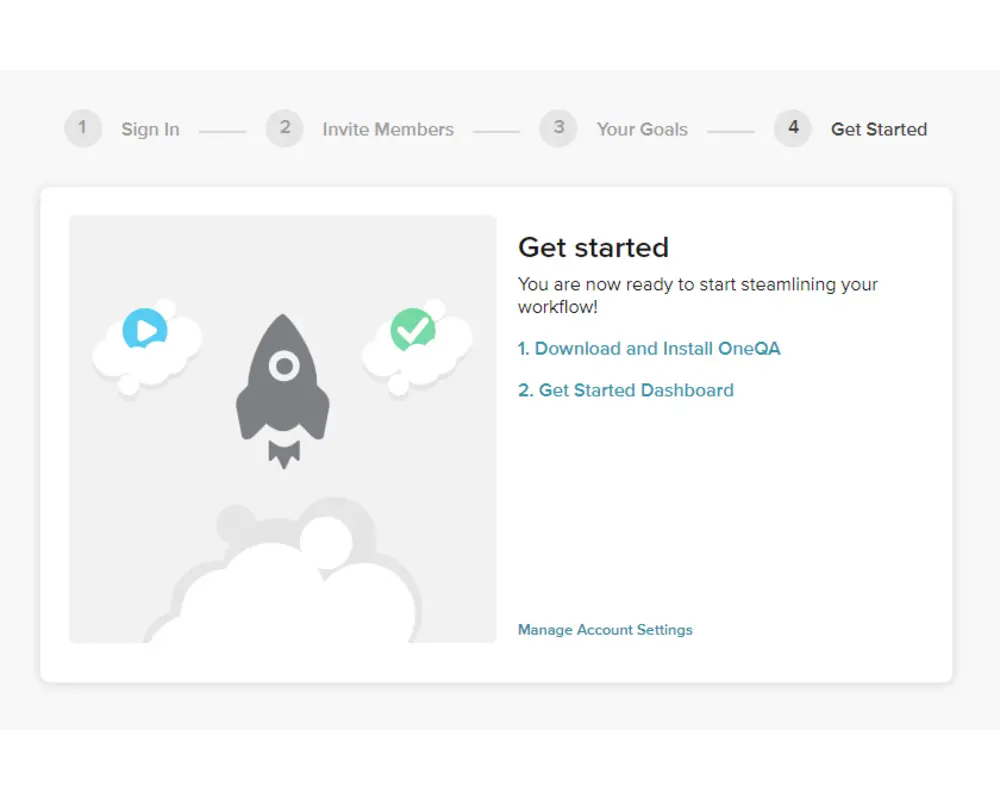
Step 5
On the final form, you should first download the installer for the OneQA desktop application. Execute the installer and follow the installation wizard to setup OneQA on your PC, then launch the desktop application.
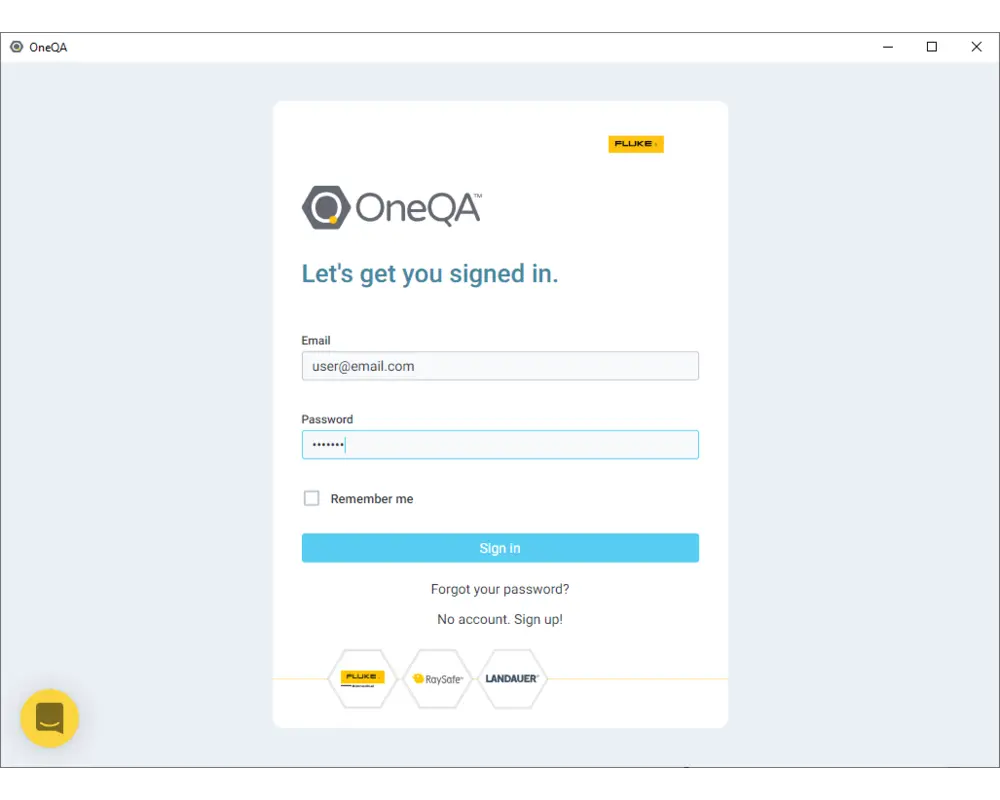
Step 6
Use the same credentials for your account to login.
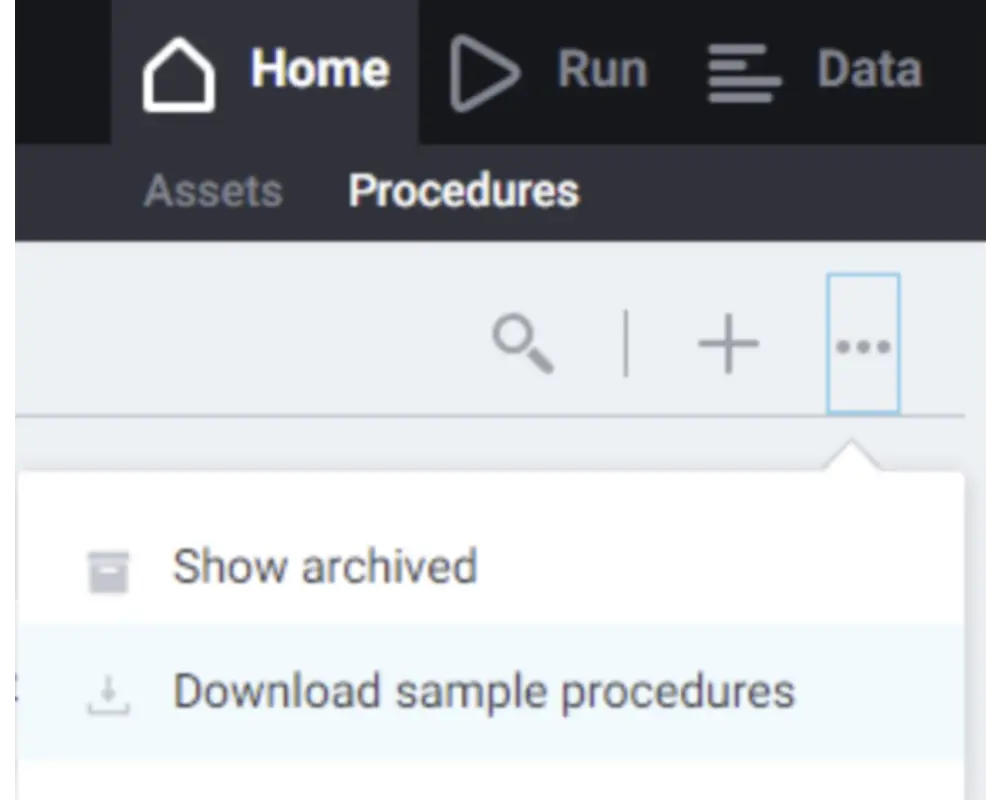
Step 7
You will land on the the Assets page, but may not have added any yet. You can return to this later. Navigate to the Procedures page in the top left corner and download the library of sample procedures. This will retrieve a set of procedures that can be modified and run.
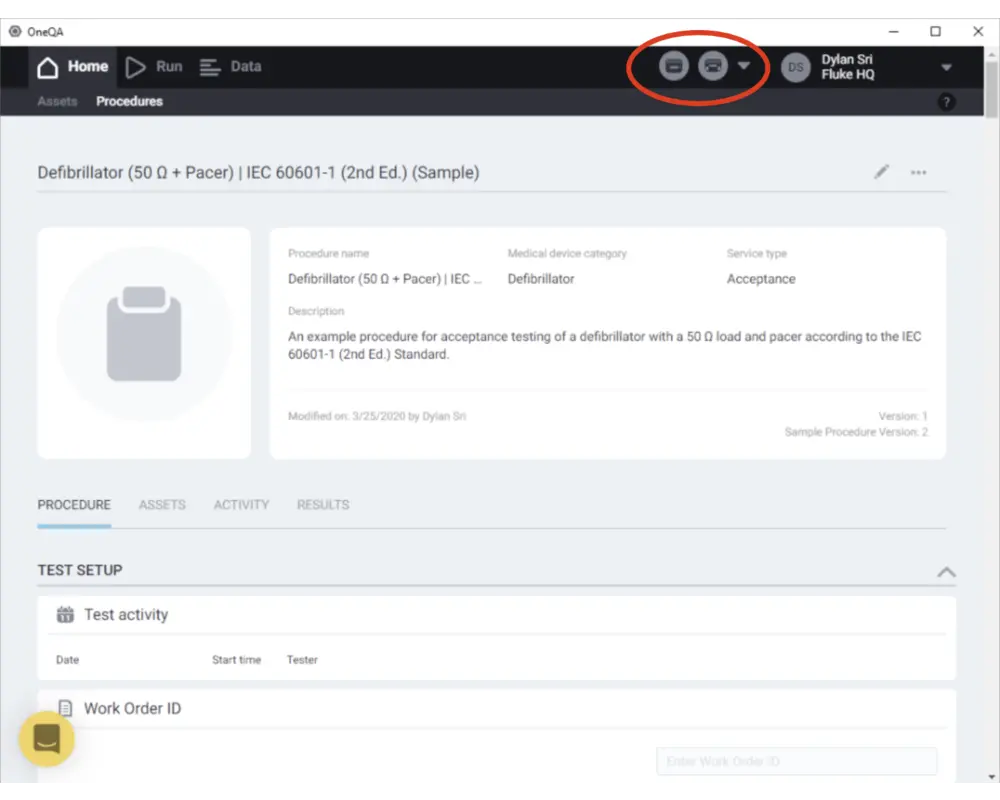
Step 8
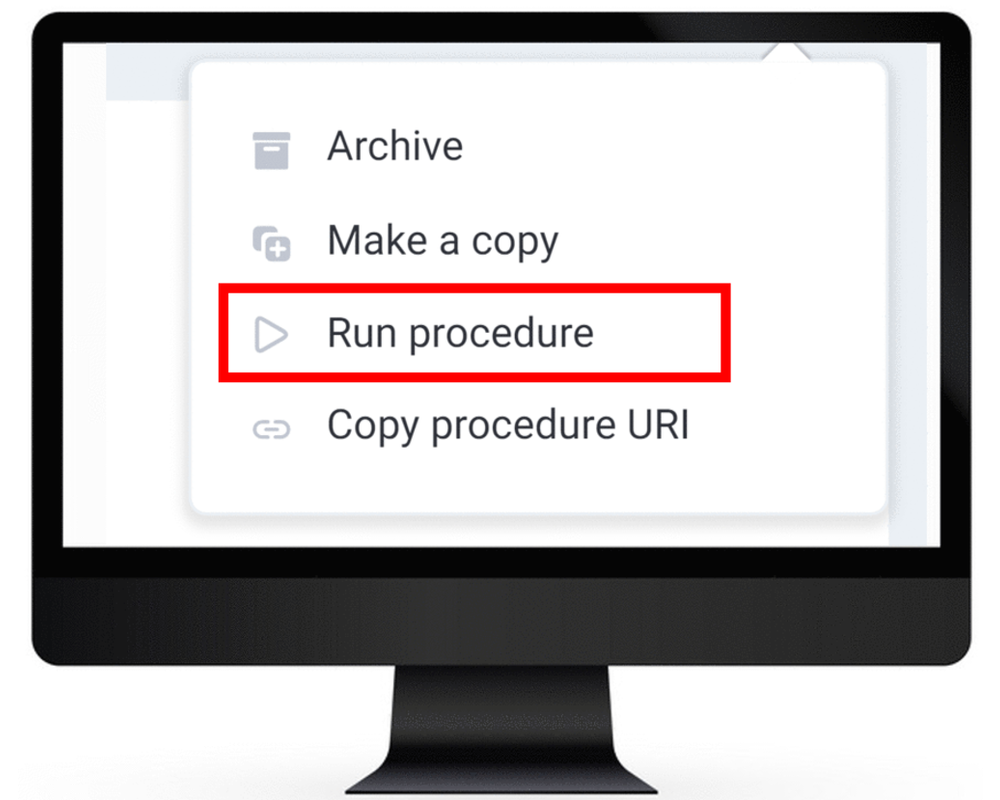
Before running a procedure, connect your ESA and/or Impulse devices to the PC via USB and power them on. See that they are detected as connected by checking the top right corner of the screen. Now you can run a procedure! Click on a procedure to see its contents.
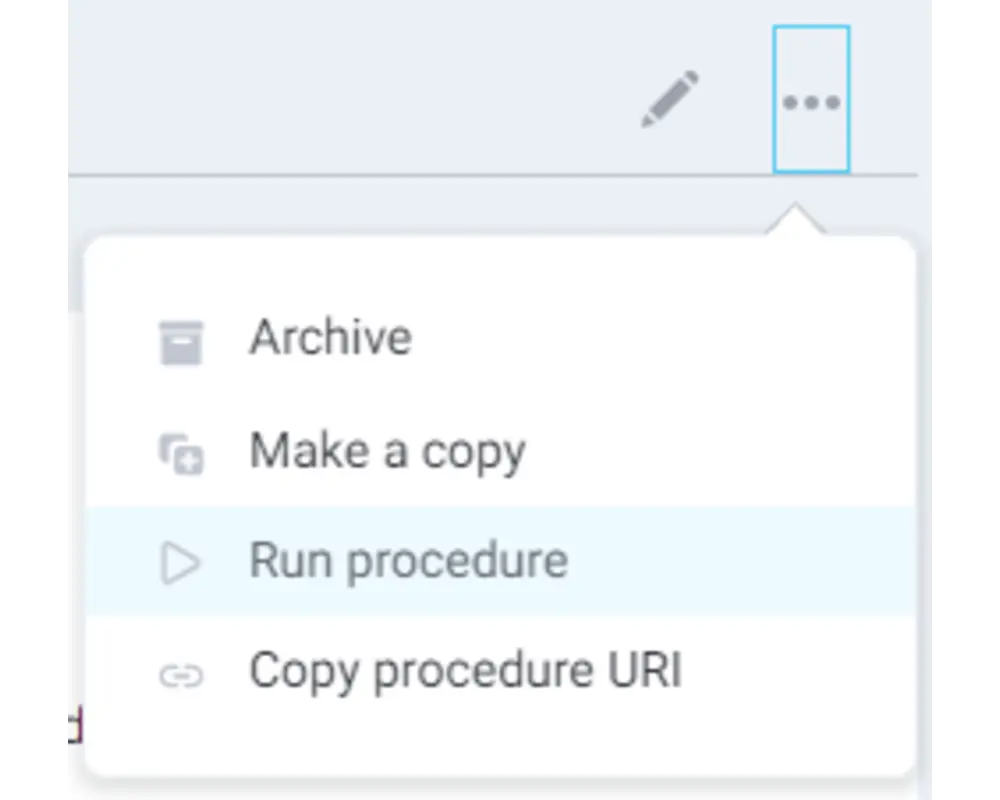
Step 9
Select Run procedure from the procedure's dropdown menu in the top right corner.
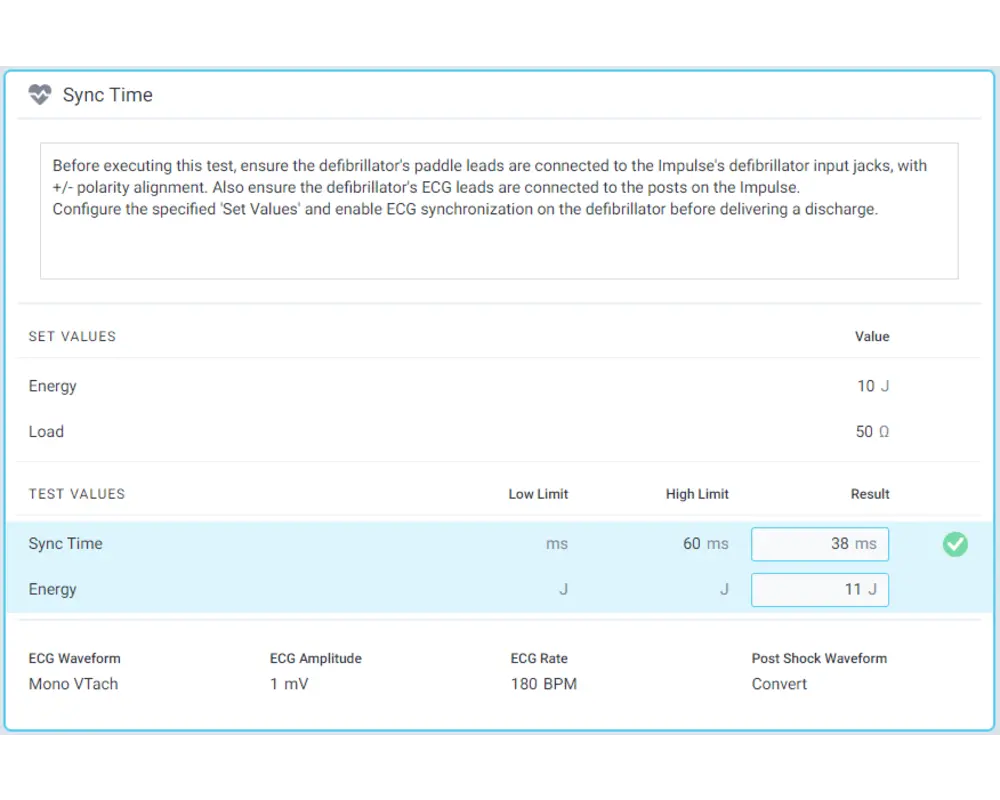
Step 10
Record results by interacting with each test and, once you have recorded all your results, click Done to store them!

Congratulations! You have automated your first test!
For more on how to get started, you can also access the Get Started Dashboard in OneQA for further tutorials and environment configuration.

Seamless QA/PM Workflows
Integrates with Your CMMS or ERP
Eliminate unnecessary steps and extra work
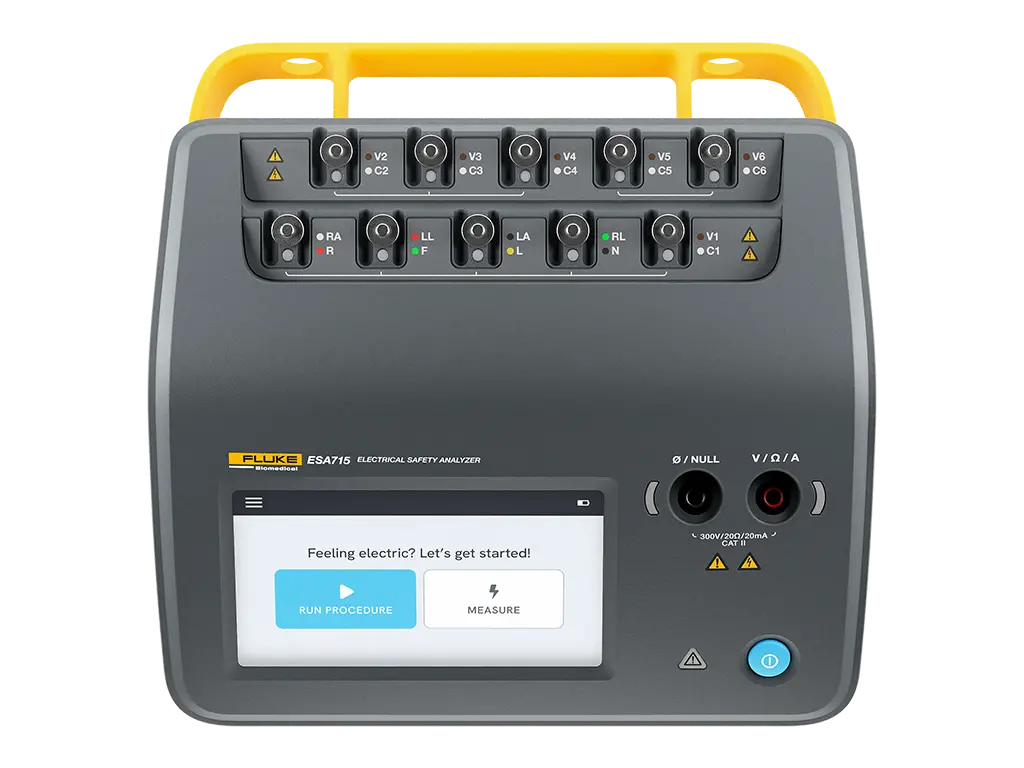
OneQA seamlessly pairs with Fluke Biomedical test tools. You can also integrate it into your asset management system to automate your QA/PM workflows from preparation through testing and archival reporting.
Simplify workflow automation with OneQA. Here's how:
- Test Automation - OneQA pairs with Fluke Biomedical analyzers to automate testing via standardized and customizable test templates
- Workflow Automation - With our pre-built CMMS integrations your work orders can automatically be updated with test results and reports
- Workflow Integration - We offer a powerful set of APIs so you can customize how OneQA fits into your workflow to further automate your asset management system
Current Pre-Built CMMS Integrations
Contact us if your CMMS is not listed below. We are continuously building new integrations.

OneQA Video Library
We empower your greatest asset, You
To be successful, you need to enhance your productivity by minimizing repetitive tasks, eliminating paperwork and improving processes. OneQA improves the safety of your equipment and gives you more time to focus on tasks that matter most.
Videos


Video
Build checklists, automate tests, file reports | Fluke Biomedical OneQA Workflow Automation Software
Watch


Frequently Asked Questions
Get the answers to commonly asked questions about OneQA.
OneQA is a software platform that enables automated workflows for testing of biomedical devices. Designed as a cloud-connected desktop application, OneQA provides tools to customize and execute test procedures, generate traceable reports, and collaborate effectively within a team and organization. With decades of in-house expertise in healthcare compliance built-in, support for a range of Fluke Biomedical test equipment, and a robust and growing procedure library available out-of-the-box, conducting testing to compliance has never been faster or easier.
OneQA is designed to assist biomedical technicians, medical device manufacturers, and quality specialists conduct preventive maintenance, acceptance testing, and quality assurance testing. With ever-growing numbers of medical devices to build, test, and maintain, OneQA provides a more efficient and sane way of managing a hectic workload, helping you conduct fast and accurate testing, minimize risk, and comply with regulations and accrediting agencies.
OneQA currently automates:
- Electrical safety tests supported by ESA612, ESA614, ESA615, ESA620, and the ESA700 Series
- Defibrillator and pacemaker tests supported by Impulse 6000D and Impulse 7000DP
- Ventilator and gas flow tests supported by VT650 and VT900/VT900A (excluding anesthesia tests)
- ProSim 8 Multifunction Patient Simulator
- Infusion pump tests supported by the IDA-6 Infusion Device Analyzer (runs OneQA onboard)
The test devices are interoperable with OneQA as is. No additional plug-ins or licenses are required to automate these devices, all that's needed is to keep their firmware versions up-to-date.
Additional devices will become supported in upcoming releases.
Yes. The OneQA API can be leveraged to interface with third-party applications, including most CMMS platforms. Integration has already been demonstrated on popular platforms including Maintenance Connection and MediMizer.
Users can execute test procedures and collect results while offline. However, some features require an internet connection, so features such as synchronizing data with other users or authoring test procedures are disabled offline.
- Windows OS: 10 (32- and 64-bit) and 11 64-bit
- RAM: 4 GB
- HD space: 1 GB
- Screen resolution: 1024x768
- .NET framework: 4.7.2
- USB port: at least one is required for connection to supported test devices
- USB port: at least one is required for connection to supported test devices
Administrator privileges are required to install and update the desktop application. Furthermore, the following URL endpoints must be accessible through your network firewall:
The OneQA Licensing Portal is where product licenses are administered and teams (a.k.a. tenants) and team members are configured for collaboration within OneQA. Through a tenant dashboard, additional users can be invited to the tenant and their permissions configured by assigning them roles.
A tenant in OneQA is a team, department, or location that contains multiple users who wish to collaborate. The tenant synchronizes data between all its members, including procedures, assets, test results, test devices, etc.
A Tenant Admin can purchase licenses, invite or remove tenant members, modify member roles, and edit the tenant details.
An Application Admin can modify member roles.
An Approver can approve or reject test results.
An Author can create or edit procedures, create or edit report templates, and edit test device information.
A User can create or edit asset information, execute procedures, and generate test reports.
Both Ansur and OneQA are tailored to automate the workflows of medical test professionals.
OneQA is cloud-connected, has an intuitive user interface, is supported by a customer success team, and will continue to add functionality in future releases.
Ansur is a standalone installation that currently supports a wider range of Fluke Biomedical test devices, including patient simulators and gas flow analyzers.
Your data will be stored on the Amazon Web Services (AWS) cloud on servers in the USA and Europe. AWS is an industry leader in meeting the requirements of the most security-sensitive organizations. For more information, visit the AWS security page.
We backup in the same AWS Region. We will not move or backup customer content outside of this region without customer consent, except if legally required and as necessary to maintain our services in case of disaster recovery or force majeure.
We use best practices for global privacy and data protection to help you operate securely within OneQA. These security protections and control processes are independently validated by third-party independent assessments.
We use strong encryption for the content in transit and at rest. These features include:
- Data encryption capabilities available in AWS storage (S3 Amazon Simple Storage Service) and database service (RDS Amazon Relational Database Service).
- AWS Key Management to secure access to our APIs.
OneQA classifies customer data into two categories: customer content and account information.
We define customer content as any custom procedure and associated content authored in our software, results, and reports generated by execution of the procedures, asset information, and associated images that a customer or any end user transfers to us for storage by the OneQA service in connection with that customer's account. Customer content does not include account information, which we describe below. The OneQA Software Agreement and Fluke Terms of Use apply to this.
We define account information as information about a customer that a customer provides to us in connection with the creation or administration of a customer account. For example, account information includes names, usernames, phone numbers, email addresses, and eventually billing information associated with a customer account. The information practices described in the Fluke Privacy Notice apply to account information.
Who controls customer content?
Customer maintains ownership of their content. We do not access or use customer content for any purpose without customer consent. We never use customer content or derive information from it for marketing or advertising.
As a customer, you maintain full control of your content and responsibility for configuring access to OneQA service and resources. We provide an encrypted access to our login-secured customer portal for Access Management. We do not access or use your content for any purpose without your consent. We never use your content or derive information from it for marketing or advertising.
We do not disclose customer information unless we're required to do so to comply with a legally valid and binding order.
Activating license key via Licensing Portal - learn more here
OneQA Privacy Toolkit
Reference these documents to understand everything you need to know about OneQA data or privacy.
For further reading, view the OneQA Knowledge Base.
Convert your checklists
Turn your checklists into a OneQA Procedure. Upload your checklists, or if you have an enterprise plan, we'll change it to a OneQA procedure for you!
Customize OneQA Procedure
OneQA comes with a wide range of standardized and customizable procedures, ready to be used by you and your team. Configurable, by adding, removing, or reordering.
Sign Up
Create your own new procedure to expand your own library of check lists, standardized tests, customizable test steps.
Make compliance inspections easy.
Take the guesswork out of inspections by having standardized questions and enable repeated sections so inspectors see the same standards applied across your institution.

Customize your templates to get the information you need
OneQA allows you to set up different response types for your templates including multiple choice, text answers, checkboxes, and more. You can also include instructions and reference photos to ensure your team knows what to look out for.
Get everyone on the same page
Our cloud platform syncing ensures that procedure updates are automatically rolled out to all users of your team.
Send us your form (PDF, word, excel, Ansur checklist)
We will convert your first checklist for free within 5 business days*
* Free conversion service limited to one English language form per customer maximum 50 line items.
We respect your privacy and will not share your form or data with anyone else.

Explore more than 50 free templates
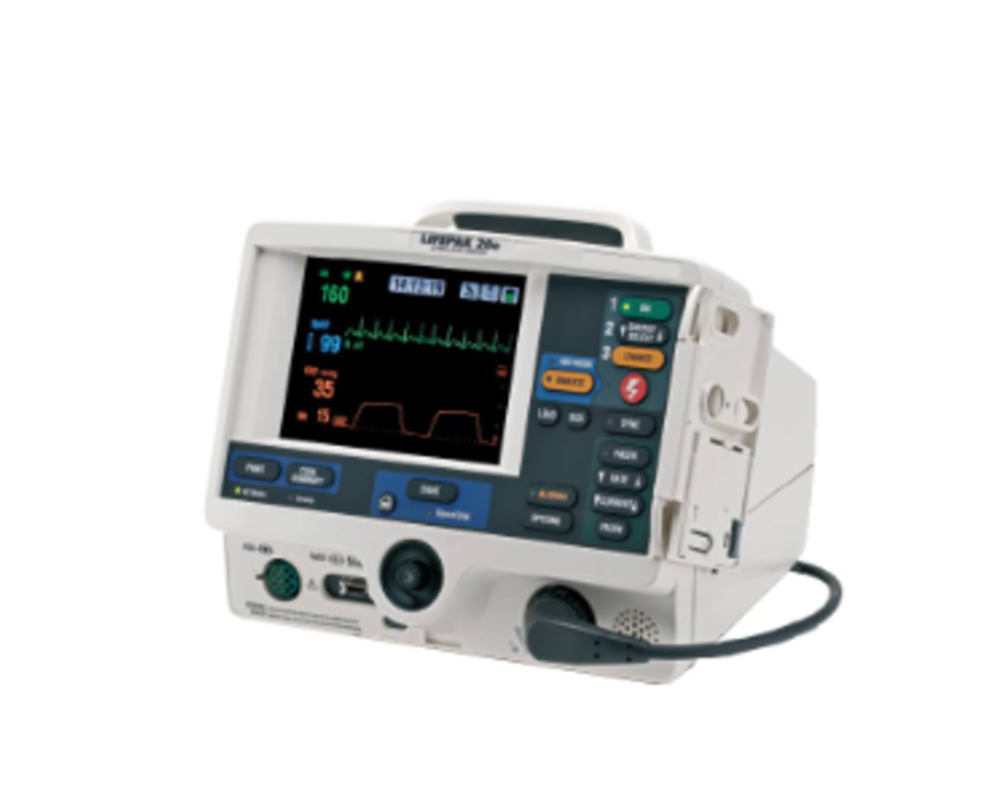
LIFEPAK 20/20e Defibrillator/Monitor | NFPA99 (2012)
ZOLL M-Series Defibrillator | NFPA99 (2012)
ZOLL R-Series Defibrillator | NFPA99 (2012)
ZOLL X-Series Defibrillator | NFPA99 (2012)
840 Ventilator | NFPA99 (2012)
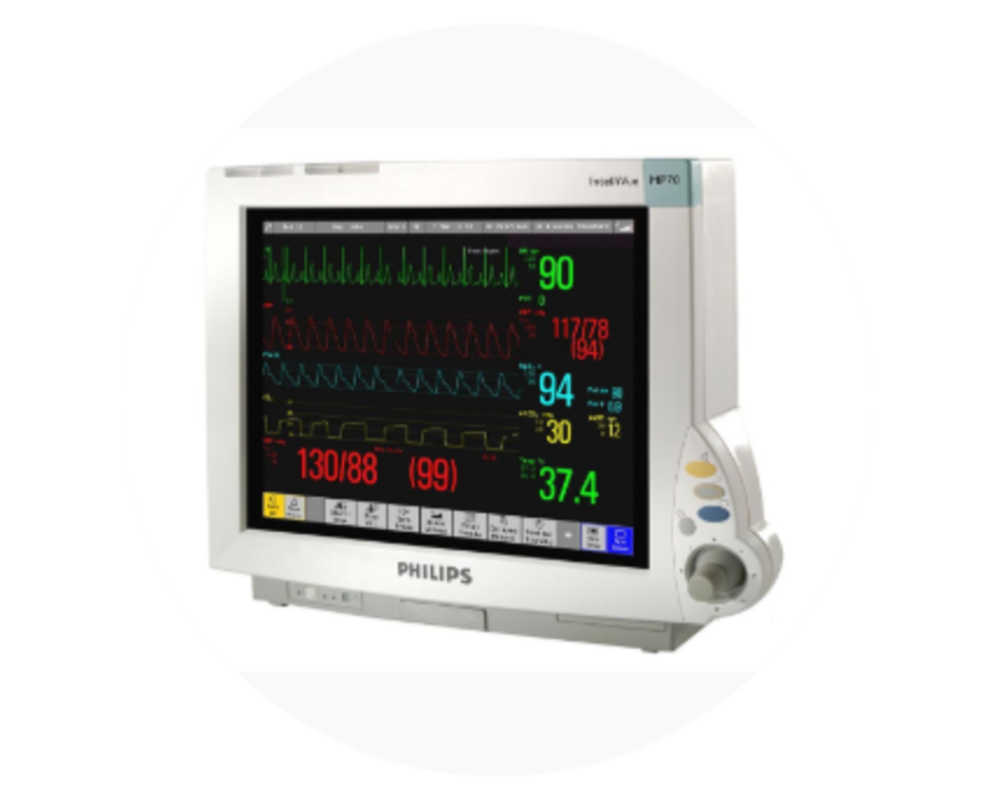
Philips IntelliVue Patient Monitor | NFPA99 (2012)
IEC 60601-1 (2nd Ed.) | Defibrillator (50 Ω + Pacer)
IEC 60601-1 (2nd Ed.) | Defibrillator (50 Ω)
IEC 60601-1 (2nd Ed.) | Defibrillator (variable Ω + Pacer)
IEC 60601-1 (2nd Ed.) | Infusion Device
IEC 60601-1 (2nd Ed.) | Patient Monitor
IEC 60601-1 (2nd Ed.) | Ultrasound
IEC 60601-1 (3rd Ed.) | Defibrillator (50 Ω + Pacer)
IEC 60601-1 (3rd Ed.) | Defibrillator (50 Ω)
IEC 60601-1 (3rd Ed.) | Defibrillator (variable Ω + Pacer)
IEC 60601-1 (3rd Ed.) | Infusion Device
IEC 60601-1 (3rd Ed.) | Patient Monitor
IEC 60601-1 (3rd Ed.) | Ultrasound
IEC 62353 (Alternative) | Defibrillator (50 Ω + Pacer)
IEC 62353 (Alternative) | Defibrillator (50 Ω)
IEC 62353 (Alternative) | Defibrillator (variable Ω + Pacer)
IEC 62353 (Alternative) | Infusion Device
IEC 62353 (Alternative) | Patient Monitor
IEC 62353 (Alternative) | Ultrasound
IEC 62353 (Differential) | Defibrillator (50 Ω + Pacer)
IEC 62353 (Differential) | Defibrillator (50 Ω)
IEC 62353 (Differential) | Defibrillator (variable Ω + Pacer)
IEC 62353 (Differential) | Infusion Device
IEC 62353 (Differential) | Patient Monitor
IEC 62353 (Differential) | Ultrasound
IEC 62353 (Direct) | Defibrillator (50 Ω + Pacer)
IEC 62353 (Direct) | Defibrillator (50 Ω)
IEC 62353 (Direct) | Defibrillator (variable Ω + Pacer)
IEC 62353 (Direct) | Infusion Device
IEC 62353 (Direct) | Patient Monitor
IEC 62353 (Direct) | Ultrasound
NFPA99 (2005) | Defibrillator (50 Ω + Pacer)
NFPA99 (2005) | Defibrillator (50 Ω)
NFPA99 (2005) | Defibrillator (variable Ω + Pacer)
NFPA99 (2005) | Infusion Device
NFPA99 (2005) | Patient Monitor
NFPA99 (2005) | Ultrasound
NFPA99 (2012) | Defibrillator (50 Ω + Pacer)
NFPA99 (2012) | Defibrillator (50 Ω)
NFPA99 (2012) | Defibrillator (variable Ω + Pacer)
NFPA99 (2012) | Infusion Device
NFPA99 (2012) | Patient Monitor
NFPA99 (2012) | Ultrasound

Speak with a OneQA expert
See how easy it is to standardize your facility, boost productivity, and maximize compliance from a single platform
Join 1500+ users who achieved seamless workflow automation with OneQA