Frequently Asked Questions
Yes, all common mammography machines are supported. Just connect the X2 MAM sensor and measure to get dose, HVL and time on any beam quality. If you also want the tube voltage (kVp), you must select an anode/filter combination. Swipe left from the home screen to select.
Take a look in the Mammography coverage table to see which anode/filter combinations the X2 can give a kVp value for.
Yes, additional badges are available for purchase.
- Yes, i3 badges can be set to stay on all the time. This will drain the battery faster, however.
Read "SETUP OF BLUETOOTH COMMUNICATION" on page 6 in the Xi View User Manual. If you have established the Bluetooth communication as described in the User Manual but still have problems, try turning off any programs on the computer that may interfere with the Bluetooth connection. On the computer side, there are various reasons for unstable Bluetooth connection such as incompatible hardware/software or environmental radio disturbances during measurements.
Position and measure as usual. The X2 has full AMX4+ support.
Please visit www.RaySafe.com/i3/downloads, download and install the latest Dose Viewer that support i2 and i3 dosimeters.
No, the intended use for the i3 and i2 systems are to measure scattered radiation only.
It is enough to measure kV for one beam quality per machine, since the set kVp is independent of anode material and filtration. The Mammography coverage table lists what you can measure on different machines.
The Compliance parameter shown on the FULL (full test) numeric display ofthe VT PLUS is a dynamic value calculated from tidal volume and pressurevalues breath-by-breath. The Cstat parameter shown on the VT305 is a staticcompliance parameter calculated using the formula Cstat = VT / (Pplateau -PEEP) where Pplateau is the Inspiratory Pause Pressure. Not all ventilatorsprovide an inspiratory pause/hold function. If there is no plateau pressure,the VT305 Cstat displays"---" since a division by zero would result.
The EMC immunity in the i3 has been significantly improved over the i2, reducing possible interference.
Real-time measurements from up to eight dosimeters are shown simultaneously on the screen. The i3 has a sleep mode so only active dosimeters user show on the screen. The i2 dosimeters are always on and shown on the screen when in range.

Display: Luminance mode. For contact measurements on a display or view box.
0: Zero adjustment.
Light bulb: Illuminance mode. For measurements of ambient light or intensity from a collimator lamp.
- Prolonged life cycle
- improved EMC immunity
- better measurement specifications
- automatic sleep mode
- improved wearability.
The DXR+ works well placed on the examination table. Use as high kV as possible.
Note: Do not position the DXR+ on top of a magnification table, since the signal is too low there.
CRC error means that part of the data has been lost or altered in transit. This can happen when the distance is too long, or if something is interfering with the signal. Create a clear line of sight between the base unit and computer, or use a shorter distance.
Press the desired parameter from the home screen to go to full screen mode, then swipe left for the waveform. Waveforms are available for kVp, dose rate and mA.
Yes, you can.
Place your CT detector on a flat surface and restart the base unit. Do not touch or move the detector. If the "Stabilizing" message does not disappear within 5 minutes, fill in a Service Request and send the detector for service.
To save measurements press and hold the "O" button at the upper rightcorner of the VT305 display until the "Data saved toDATAxx.CSV" message is displayed on screen. This meansthat the measurement values have been saved to the microSD card in the VT305.
The i3 measurement performance is an improvement over the i2, and includes angular reception making it more accurate.
The real-time display can be installed anywhere, it only needs a power outlet (network connection is optional). The dosimeters communicate with the display via radio. The radio communication range depends on the local environment and the Real-time Display settings (Service Manual) but is normally about 5-15 meters.
The X2 Base Unit can store several thousands of measurements.
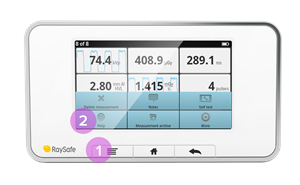
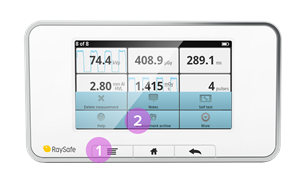
- Swipe down from the home screen to see previous measurements.
- If the base unit has been turned off, or if you have switched to a different sensor, look in the measurement archive: Press the menu button and then Measurement archive. Select the session you want to take a look at.
- You can also use X2 View on a computer and select Import from Base Unit in the File menu and select from the calendar. See the X2 View manual for more details.
No, you have to send it to RaySafe for battery replacement. Fill in a Service Request to get it done.
To update firmware in the VT305 do the following:1. You will receive an update file (e.g. filename C0204000.S19) fromFluke Biomedical.2. Remove the micro SD Card from the VT305 and insert the card into your PC.3. Copy the update file onto the microSD Card.4. Remove the micro SD Card from the PC.5. Insert the micro SD Card back into the VT305.6. Restart the device (power on the VT305).7. The screen will show you the update's progress8. When the update is finished, the device will restart by itself.
The user manual for X2 is called "Help" and is integrated in the base unit. Press the menu button on your base unit and then "Help" to see the user manual for your system. You can also find video tutorials and pdf-manuals on the Product support page.