Six parameters in five minutes
By Dennis McMahon, Dennis McMahon Consulting
Time-effective testing of patient monitors with the ProSim™ 8 Vital Signs Simulator
One of the challenges faced by the biomedical technician is performing periodic functional performance verifications on a large number of patient monitors. Typically, your CMMS software will generate a list of monitors by model or by department that are scheduled for preventive maintenance every six or twelve months. In most facilities, the monitors must be checked on-site i.e. in the location where they are assigned. We rarely have the luxury of taking them to the shop where they can be checked in a systematic, orderly sequence. Nor, in most cases, is it practical? In most situations, it is necessary to verify the location of the monitors, then diplomatically ask the clinical staff for access to the monitors; which often requires performing the PMs as quickly as realistically possible.
This situation underscores the value of a simulator that incorporates all clinical parameters, thereby minimizing the number of test devices and associated accessories, cables, and power supply modules needed for each verification procedure. An ideal simulator will also provide pre-configured sets of abnormal as well as normal values or waveforms necessary for testing any patient monitor, from a basic NIBP machine in an outpatient clinic to a fully-opted multiparameter monitor on a cardiovascular anesthesia workstation.
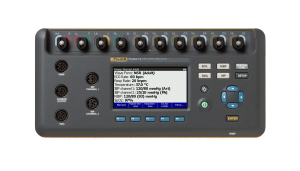
The Fluke ProSim 8 provides pre-sets for the six most commonly used parameters:
- Electrocardiograph (ECG)
- Non-invasive blood pressure (NIBP)
- Invasive blood pressure (IBP)
- Oxygen saturation (SpO2)
- Respiration
- Temperature
When initially powered-on, the ProSim 8 defaults to a “Normal” pre-set for these six values, and the user can select a “Hypertensive” as well as a “Hypotensive” pre-set.
In terms of time, NIBP is unique among these parameters since it requires the unit under test (UUT) to pressurize a cuff or reservoir, then slowly decrease the pressure while making a determination of systolic, diastolic, and mean arterial pressures. On its initial NIBP cycle, the typical monitor will pressurize to160 mmHg. If the simulated systolic pressure is 120 mmHg, the UUT will successfully detect that systolic value, and store it in memory for use in the next NIBP cycle. On starting the next cycle, most NIBP monitors will pump up to a value slightly above the last systolic value, on the premise that the patient’s systolic pressure likely hasn’t increased significantly since the last cycle. However, if the next simulated systolic is in the “Hypertensive” pre-set, e.g. 200 mmHg, the UUT will “look” for the lower (“Normal”) systolic. Because it will detect pulsations immediately, its software will determine that the new systolic is higher, and command a new NIBP cycle. In some monitors the second cycle may still not find the new systolic value, requiring a third attempt. All of this will require additional time, so the proper sequence of test pre-sets will make a big difference in the total time taken for a thorough functional test.
In order to minimize the time taken for NIBP determinations, we recommend testing in the following sequence of pre-sets: “Hypertensive”, then “Normal”, then “Hypotensive”. Most monitors will require a re-attempt to detect the high systolic value on the first cycle, but NIBP cycles for the subsequent pre-sets will be made in one attempt. Our validations show that after brief familiarization, a technician can test a monitor for all six parameters in all three pre-set configurations in less than five minutes.
Suggested procedure:
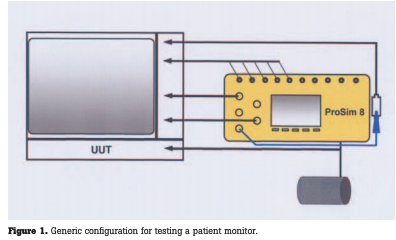
- Connect the UUT to the ProSim™ 8 with the appropriate ECG connections, NIBP test setup, pulse-oximeter sensor, and adapters for invasive blood pressure and temperature. See Figure 1.
- Power-on the UUT and the ProSim 8. (Set the NIBP function on the UUT to manual mode, if necessary.)
- Select the “Hypertensive” pre-set softkey on the ProSim 8.
- Start an NIBP cycle on the UUT; while the NIBP is being determined, verify that the other five parameters are within tolerances for the UUT.
- When the NIBP has been determined, verify that is within tolerances for the UUT.
- Select the “Normal” preset softkey on the ProSim 8.
- Repeat steps 4) and 5)
- Select the “Hypotensive” preset softkey on the ProSim 8.
- Repeat steps 4) and 5)
For testing a monitor in more depth, use the Autosequences feature available with the “Special Functions” key. With this feature, any one parameter or clinical status can be checked at many pre-configured points with a minimum of keystrokes. See the ProSim 8 Users Manual, page 55.
Testing patient care equipment can be a logistical challenge, and there is always the temptation to take short-cuts in order to meet time constraints. Using pre-configured values for normal as well as abnormal clinical states, a full-function simulator like ProSim 8 can enable the technician to test any patient monitor thoroughly in minimal time.